Flutter로 Facebook Login 구현해보기(개발 테스트편) part1.
먼저 개발자 홈페이지에 앱을 만들고 등록해야합니다.
https://developers.facebook.com 에 접속합니다.

'시작하기' 클릭!

'계속하기' 클릭!!

이메일 인증을 하시면 됩니다. 그런데!!! 인증하실 때
페이스북을 사용자 기기(노트북 or 데스크탑)에서 접속한 이력이 없으면 신뢰할 수 없는 기기 또는 브라우저라는 팝업(사진은 캡처 못했어요)이 뜹니다.
당황하지 마시고 사용자 기기에서 페이스북 활동(글쓰기, 검색)을 하시면서 1~2주 정도 기다리시면 인증이 됩니다.

인증이 되면 '앱 만들기'를 클릭해주세요

앱 이름을 작성해주세요

운영할 목적으로 만드시는 앱이라면 'Facebook 로그인을 통한 인증 및 사용자의 데이터 요청'이 더 적합하지만 개발 프로젝트에서 로그인 테스트가 목적이라면 '기타'를 선택해주세요

'소비자' 클릭

'앱 만들기'를 누르시면 앱이 만들어집니다.

상단의 '앱 ID'를 확인하세요! 프로젝트 설정에 등록해야하는 앱 고유 ID입니다. 클릭 하시면 복사 됩니다.
Facebook 로그인을 위해서 추가로 설정할 것이 있습니다 'Facebook 로그인'의 '설정' 버튼을 눌러주세요.
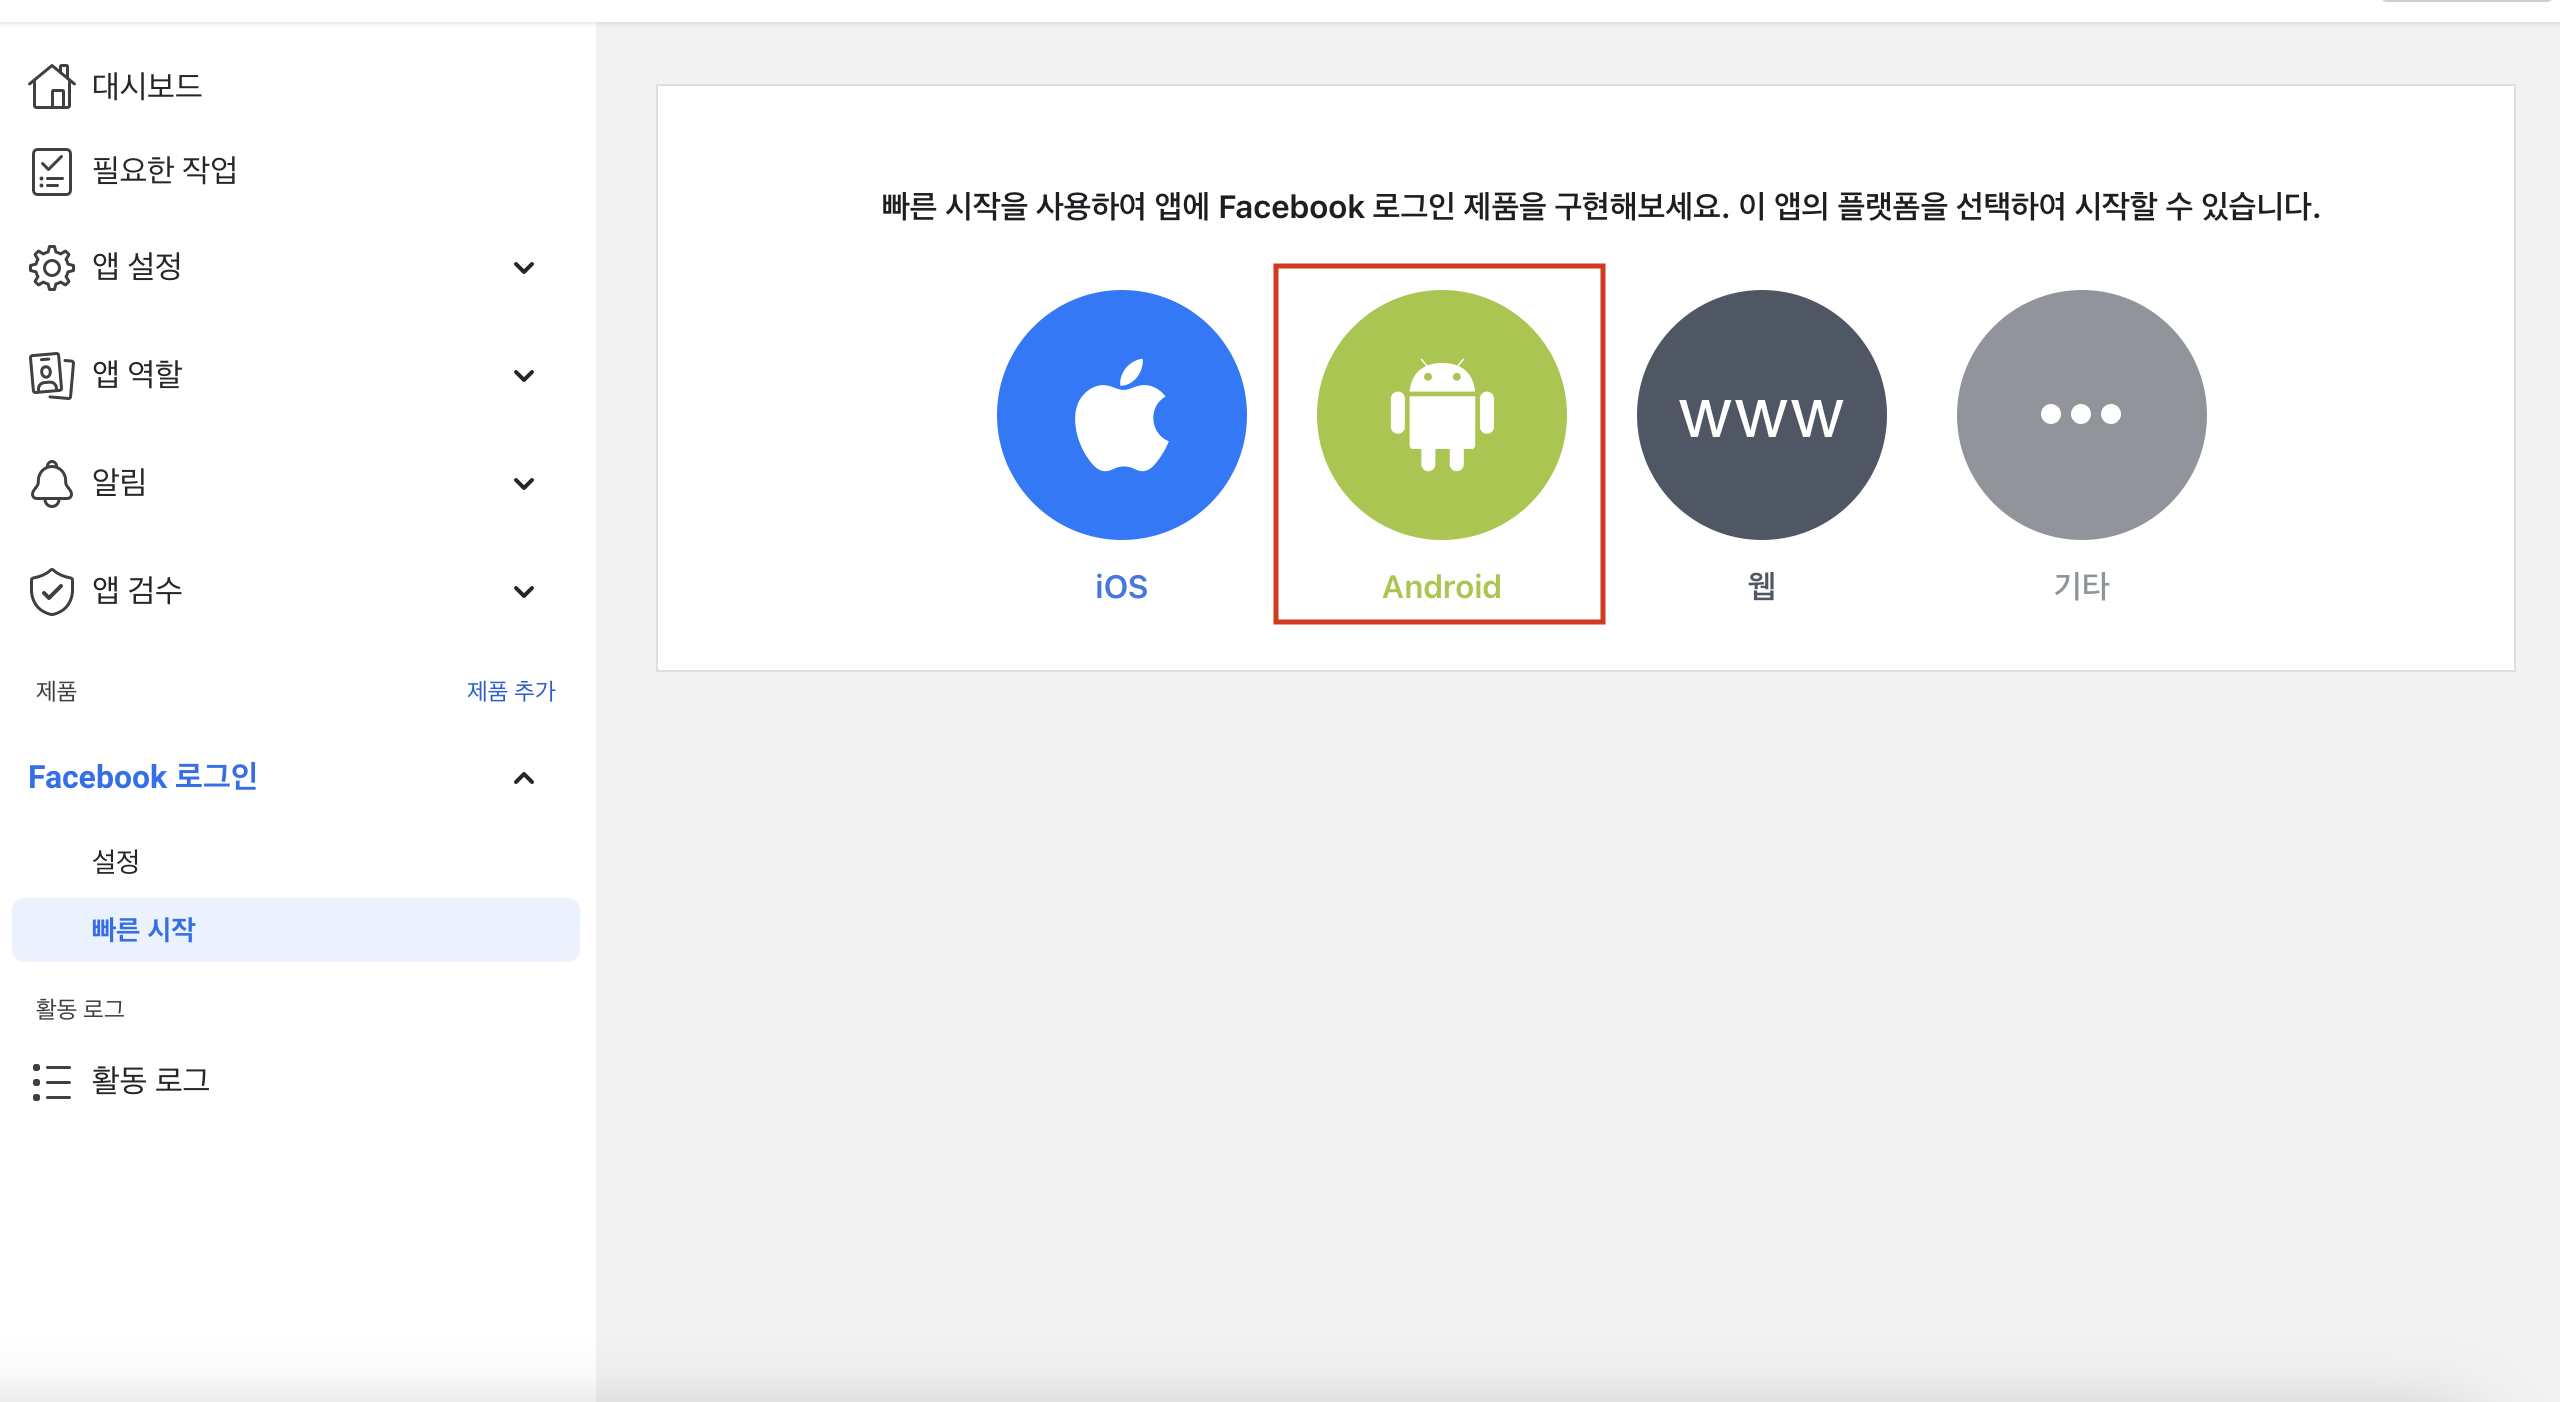
안드로이드 먼저 진행할게요. '안드로이드' 클릭!!

1,2번은 '다음' 눌러서 생략하고 3번 'Android 프로젝트에 대해 Facebook에 알리기' 에서
패키지 이름과 패키지 이름.MainActivity 를 넣어주시고 'save' 클릭! 계속 눌러서 4번으로 넘어갈게요.

키 해시를 생성해야하는데 해당하는 OS의 명령어를 복사해서 입력하면 됩니다. Mac 은 터미널 창 Windows 는 cmd창에 하면 되겠죠?

생성된 키해쉬를 입력하고 'save' 눌러주세요.

SSO 활성화를 '예' 로 변경해주시고 'save' 해주세요.
이제 flutter 프로젝트로 가겠습니다.
프로젝트의
android/app/src/main/res/strings.xml 파일을 열어주세요.
strings.xml 파일이 없다면. 만들어주시고 아래 사진처럼 코드를 넣어주세요
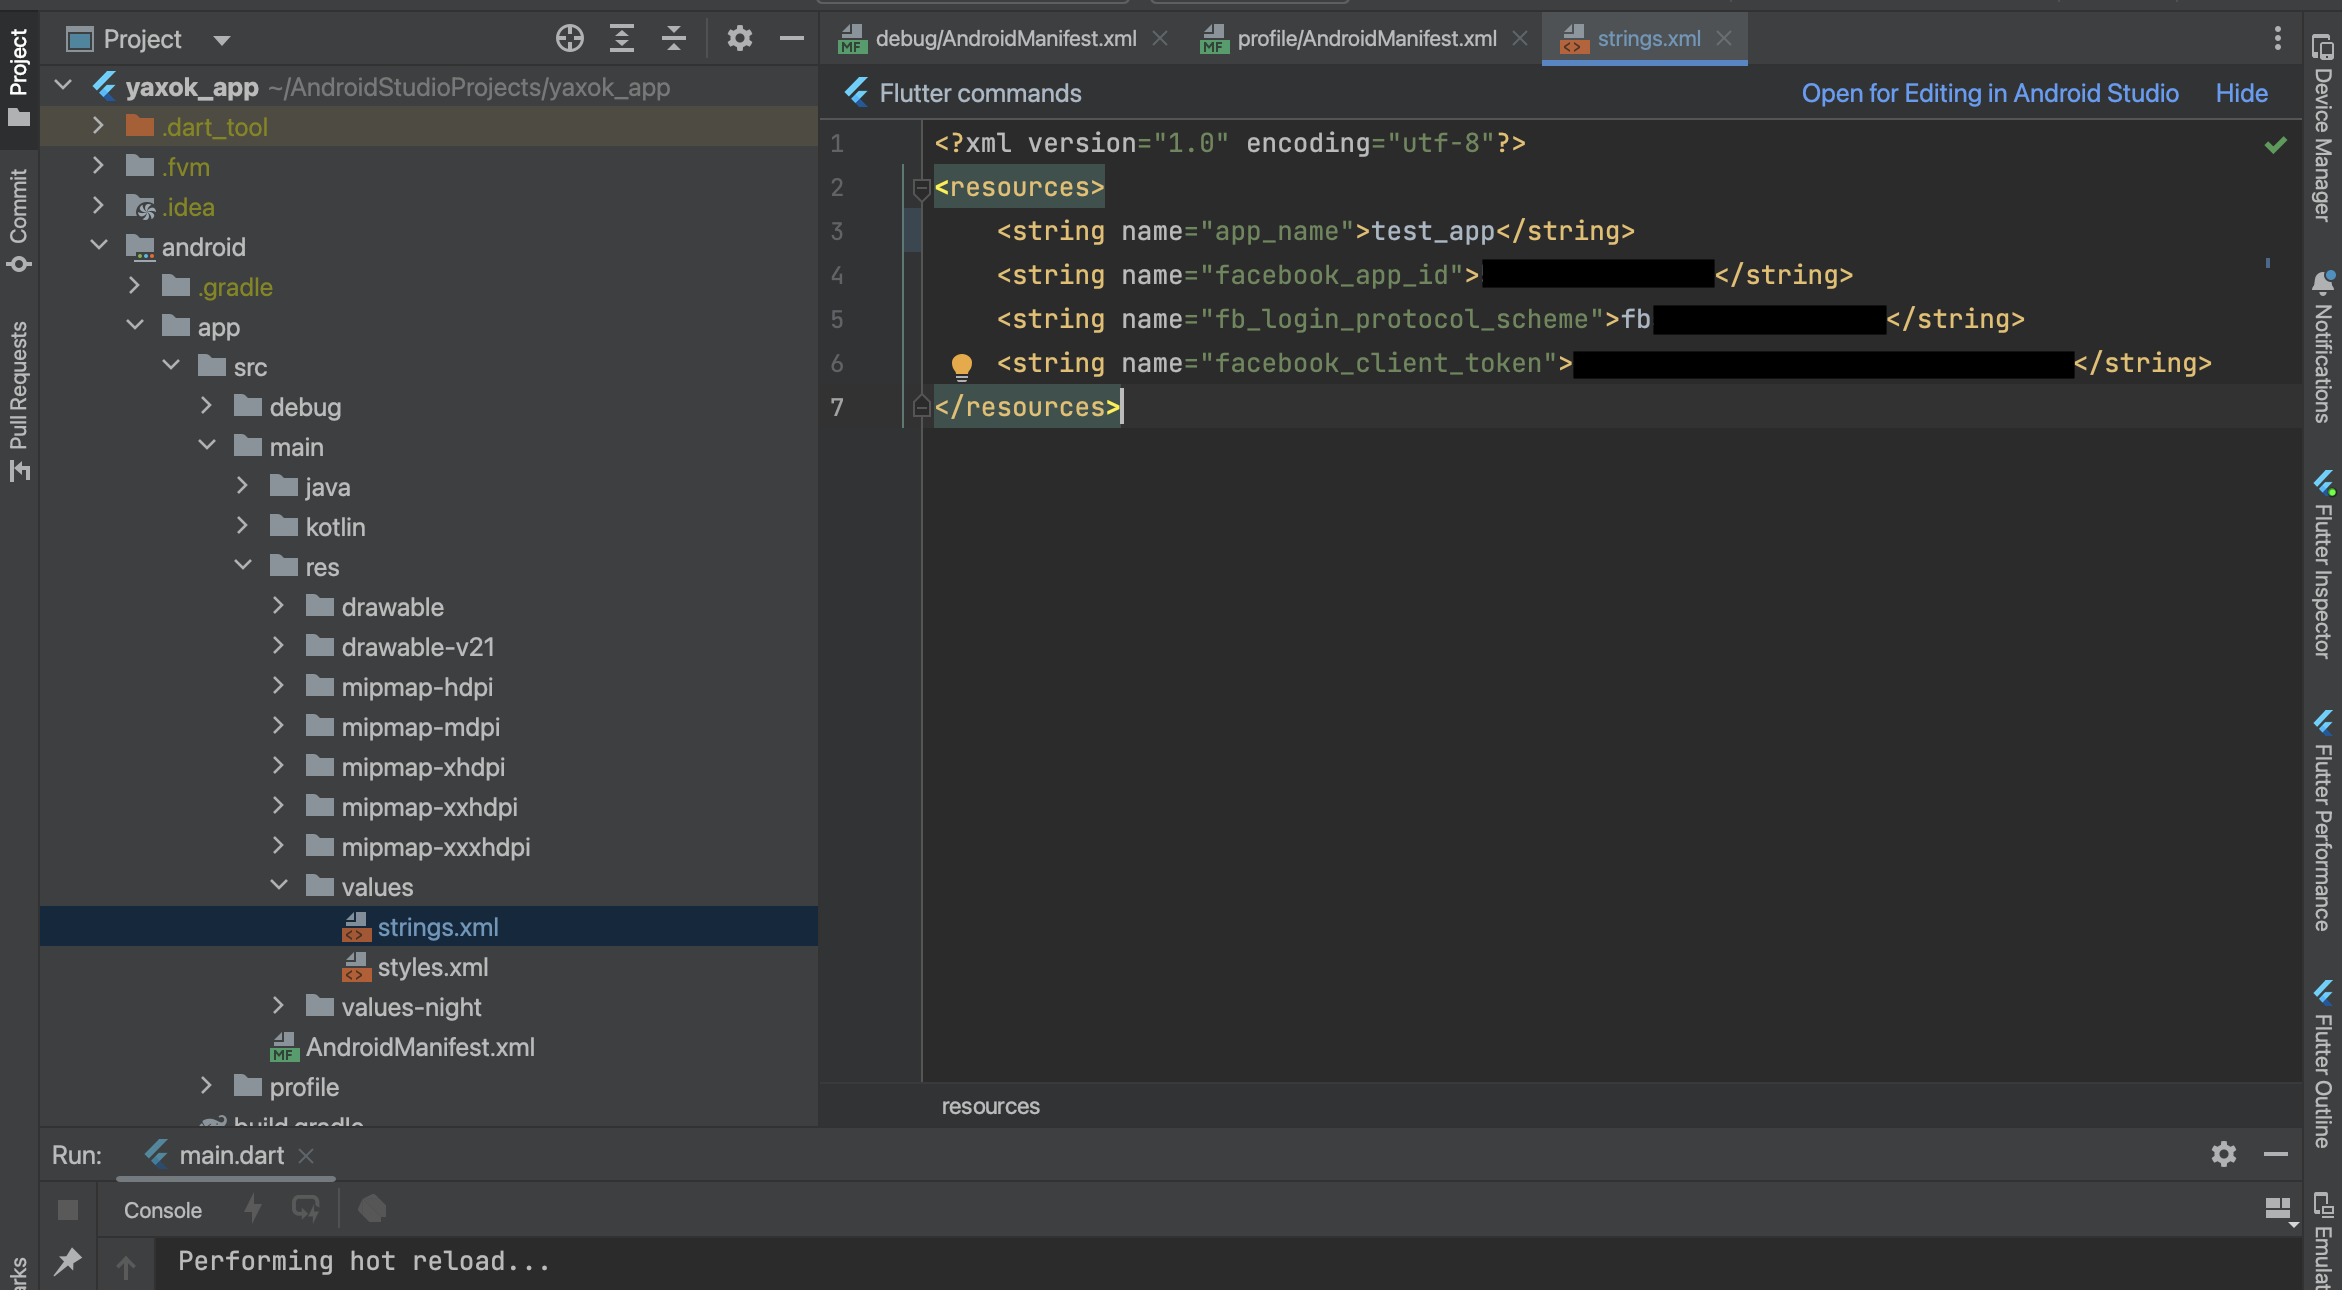
<?xml version="1.0" encoding="utf-8"?>
<resources>
    <string name="app_name">name</string>
    <string name="facebook_app_id">111111</string>
    <string name="fb_login_protocol_scheme">fb111111</string>
    <string name="facebook_client_token">token</string>
</resources>
- app_id 는 위에서 설명 드렸듯이 대시보드 상단에 클릭할 수 있게 되어 있습니다.
- fb_login_protocol_scheme은 fb + app_id 입니다. ( 위에 코드처럼 app_id가 111111이라면 -> fb111111 이렇게 입력해주세요)
- facebook_client_token값은 대시보드에서 설정 -> 고급설정에 있습니다.(아래 사진 참고)

마지막으로 android / app / src / main / AndroidManifest.xml 을 열어주세요!!
<manifest xmlns:android="http://schemas.android.com/apk/res/android">
    <application
        android:label="test_app"
        android:name="${applicationName}"
        android:icon="@mipmap/ic_launcher">

   <!-- 여기부터 -->

        <meta-data
            android:name="com.facebook.sdk.ApplicationId"
            android:value="@string/facebook_app_id" />
        <meta-data
            android:name="com.facebook.sdk.ClientToken"
            android:value="@string/facebook_client_token" />


        <activity
            android:name="com.facebook.FacebookActivity"
            android:configChanges="keyboard|keyboardHidden|screenLayout|screenSize|orientation"
            android:label="@string/app_name" />


        <activity
            android:name="com.facebook.CustomTabActivity"
            android:exported="true">
            <intent-filter>
                <action android:name="android.intent.action.VIEW" />
                <category android:name="android.intent.category.DEFAULT" />
                <category android:name="android.intent.category.BROWSABLE" />
                <data android:scheme="@string/fb_login_protocol_scheme" />
            </intent-filter>
        </activity>

   <!-- 여기까지 -->

        <activity
            android:name=".MainActivity"
            android:exported="true"
            android:launchMode="singleTop"
            android:theme="@style/LaunchTheme"
            android:configChanges="orientation|keyboardHidden|keyboard|screenSize|smallestScreenSize|locale|layoutDirection|fontScale|screenLayout|density|uiMode"
            android:hardwareAccelerated="true"
            android:windowSoftInputMode="adjustResize">
            <!-- Specifies an Android theme to apply to this Activity as soon as
                 the Android process has started. This theme is visible to the user
                 while the Flutter UI initializes. After that, this theme continues
                 to determine the Window background behind the Flutter UI. -->
            <meta-data
              android:name="io.flutter.embedding.android.NormalTheme"
              android:resource="@style/NormalTheme"
              />
            <intent-filter>
                <action android:name="android.intent.action.MAIN"/>
                <category android:name="android.intent.category.LAUNCHER"/>
            </intent-filter>
        </activity>
        <!-- Don't delete the meta-data below.
             This is used by the Flutter tool to generate GeneratedPluginRegistrant.java -->
        <meta-data
            android:name="flutterEmbedding"
            android:value="2" />
    </application>
</manifest>
기존코드에서 어떻게 뭘 추가하는거지? 헷갈리실수 있는데 위에 보시면 주석으로 '여기부터' '여기까지' 사이의 코드를 복사해서 기존 코드 같은 위치에 붙여넣기 하시면 됩니다.!!
이렇게 안드로이드는 끝이고 이제 IOS 설정을 진행 하도록 하겠습니다.

대시보드에서 좌측에 'Facebook 로그인' -> '빠른시작' -> ios 선택!

1번 생략하고 2번 '번들 식별자 추가' 에서 '번들 ID' 입력해주시고 저장해주세요. 안드로이드에서 설정한 패키지 이름과 동일하게 하는것을 추천드립니다. 그리고 이 번들 ID는 ios 디버그를 위해 빌드시 Xcode에도 들어갑니다.

'SSO 활성화'를 '예'로 해주시고 저장 누르시면 됩니다.
마지막으로
IOS Info.plist 설정을 하면 준비 셋팅은 다 끝납니다.

ios/Runner/info.plist 파일을 열어주세요~
<?xml version="1.0" encoding="UTF-8"?>
<!DOCTYPE plist PUBLIC "-//Apple//DTD PLIST 1.0//EN" "http://www.apple.com/DTDs/PropertyList-1.0.dtd">
<plist version="1.0">
<dict>
	<key>CFBundleDevelopmentRegion</key>
	<string>$(DEVELOPMENT_LANGUAGE)</string>
	<key>CFBundleDisplayName</key>
	<string>Test111111</string>
	<key>CFBundleExecutable</key>
	<string>$(EXECUTABLE_NAME)</string>
	<key>CFBundleIdentifier</key>
	<string>$(PRODUCT_BUNDLE_IDENTIFIER)</string>
	<key>CFBundleInfoDictionaryVersion</key>
	<string>6.0</string>
	<key>CFBundleName</key>
	<string>test_app</string>
	<key>CFBundlePackageType</key>
	<string>APPL</string>
	<key>CFBundleShortVersionString</key>
	<string>$(FLUTTER_BUILD_NAME)</string>
	<key>CFBundleSignature</key>
	<string>????</string>

    <-----------여기부터------------->

    <key>CFBundleURLTypes</key>
    <array>
      <dict>
      <key>CFBundleURLSchemes</key>
      <array>
        <string>fbAPP_ID</string>
      </array>
      </dict>
    </array>

    <key>FacebookAppID</key>
    <string>APP_ID</string>

    <key>FacebookClientToken</key>
    <string>CLIENT_TOKEN</string>

    <key>FacebookDisplayName</key>
    <string>APP_NAME</string>

    <key>LSApplicationQueriesSchemes</key>
    <array>
      <string>fbapi</string>
      <string>fb-messenger-share-api</string>
    </array>

        <-----------여기까지------------->


	<key>CFBundleVersion</key>
	<string>$(FLUTTER_BUILD_NUMBER)</string>
	<key>LSRequiresIPhoneOS</key>
	<true/>
	<key>UILaunchStoryboardName</key>
	<string>LaunchScreen</string>
	<key>UIMainStoryboardFile</key>
	<string>Main</string>
	<key>UISupportedInterfaceOrientations</key>
	<array>
		<string>UIInterfaceOrientationPortrait</string>
		<string>UIInterfaceOrientationLandscapeLeft</string>
		<string>UIInterfaceOrientationLandscapeRight</string>
	</array>
	<key>UISupportedInterfaceOrientations~ipad</key>
	<array>
		<string>UIInterfaceOrientationPortrait</string>
		<string>UIInterfaceOrientationPortraitUpsideDown</string>
		<string>UIInterfaceOrientationLandscapeLeft</string>
		<string>UIInterfaceOrientationLandscapeRight</string>
	</array>
	<key>UIViewControllerBasedStatusBarAppearance</key>
	<false/>
	<key>CADisableMinimumFrameDurationOnPhone</key>
	<true/>
	<key>UIApplicationSupportsIndirectInputEvents</key>
	<true/>
</dict>
</plist>
이것도 마찬가지로 기존 파일에서 뭘 추가해야하나 헷갈리실텐데 위에 코드에서 '여기부터' '여기까지' 안에 있는 코드를 복사에서 기존코드에 추가하시면 됩니다. (----여기부터----, -----여기까지----- 는 같이 붙여 넣으시면 안돼요 이해를 도울려고 써논겁니다. 사이에 코드만 복붙해주세요!! )
fbapp_id, app_id, client_token, app_name은 안드로이드에서 설정한 것처럼 여러분들의 App정보로 넣어야되는 값이라는거 꼭 체크해주세요!!!
이렇게 하시면 모든 셋팅이 끝납니다. 다음 글에서는 flutter에서 기능 구현을 하는 코드로 찾아뵙겠습니다.